
苹果在本周五推送了 XCode 6 的更新,正式提供了针对 iOS 的 Swift 开发环境,OS X 的 Swift 支持等待后续更新。下面初步入门一下 Swift 的基本功能,有的地方也跟 Objective-C 做个对比。
First Impression
跟 Objective-C 对比,几个显著的变化:
- Objective-C 是 C 的超集,但 Swfit 不是。在 Objective-C 项目里直接贴进来一段纯 C 的代码,是可以编译通过的。但是 Swift 项目就不行了;
- 不需要分号结束语句。注意是不需要,而不是禁止。如果习惯了强制分号的语言,偶尔在语句末尾添加了分号完全没有影响。苹果官方的示例是不使用分号的。当然,若同一行要出现两条语句,那可以用分号分隔;
- Objective-C 的项目入口必然是一个 main 方法,但 Swift 项目不需要。
Playground
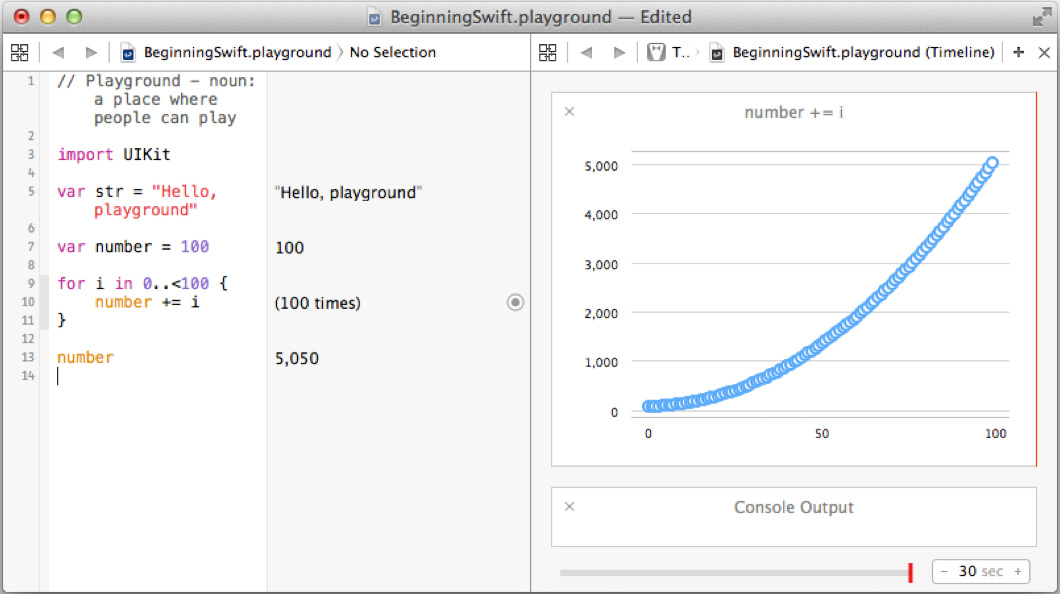
使用 Playground 方便快速验证某段代码。不需要任何 print 或者 log 相关的语句,就能够实时看到代码的运行结果。
在启动 XCode 没有打开任何项目的时候,欢迎屏幕上第一个选项就是新建 Playground。或者使用 Cmd + Shift + Opt + N。
对于普通的语句,Playground 会直接在右侧面板给出结果。如果是个循环之类的,可以把鼠标滑到右侧面板的 (xxx times) 上,点击 Value History 按钮来以图表的方式查看值的变化情况。
Variables
Swift 里所有的变量都必须用 var 关键字来声明。当声明变量的同时赋予变量初始值,则不需要显式指定变量的类型。Swift 会自动判断之。
例如,下面 3 行代码,Swift 会根据初始值自动判断 number 变量的类型为 Int,name 变量的类型为 String,isDone 变量的类型为 Bool。并且,String 类型终于不再需要使用 Objective-C 里边的 @ 了。而 Bool 类型的值也从 YES 或 NO 变为 true 或 false。
1
2
3
var number = 100   // Int
var name = "YeHao" // String
var isDone = true  // Bool
当变量类型确定之后,则后续无法再更改。例如上述 name 变量,若再次赋值 name = 99,则出现编译错误。
如果声明变量时无法提供初始值,则必须指定变量类型。
1
2
var score:Float
var message:String
所有变量类型的首字母都是大写的,例如 Int,Float,Double,Bool,String,Character 等。
Constants
使用 let 关键字来声明常量。跟 var 声明的变量相比,除了关键字不同,在首次赋值之后无法更改常量值之外,两者的其他语法都是一样的。
1
2
let firstName = "Hao" // String
let rate:Float = 4.5
在 Playground 里边,必须在 let 声明的同时指定常量的值。在实际项目中,可能会在类中声明常量但后来赋值。但也只能赋值一次。
在 Swift 里边,使用 let 胜过 var。这是苹果推荐的方式,只要确定赋值后不会改变值,那就优先使用 let 而不是 var。这也在性能上有优化。
在 Objective-C 里边,很多类都有两个版本,例如 NSString 和 NSMutableString,NSArray 和 NSMutableArray。在 Swift 里边,可以理解为使用 var 声明的 String 或者 Array 对应了 mutable 的版本;使用 let 声明的 String 或者 Array 则对应 immutable 版本。可能刚开始会觉得常量个数肯定不会很多的,但是在 Objective-C 中使用 NSString 的次数一般来说都是大于 NSMutableString 的。从这个角度来看,使用 let 也应该是件很自然的事。
Printing
Swift 提供了 print 和 println 来打印一段信息,后者是 print line 的缩写,打印结果会带上换行符,因此更为常用。
在 Objective-C 里边,使用 NSLog 时会在要打印的字符串中设置占位符,例如
1
2
3
4
5
NSString *day = @"Sunday";
NSString *city = @"Hangzhou";
int temperature = 23;

NSLog(@"The average temperature for %@ on %@ is %i degrees.", city, day, temperature);
在 Swift 里边,使用的方式叫做字符串插值(String Interpolation),例如
1
2
3
4
5
let city = "Hangzhou"
var day = "Sunday"
var temperature = 23

println("The average temperature for \(city) on \(day) is \(temperature) degrees.")
这个语法,\(),括号里的代码是个表达式,因此也可以做一些运算。
在 Objective-C 里边,下面这个输出方式是合法的,编译器会自动做类型转换。
1
2
3
4
5
int quantity = 13;
float unitPrice = 7.3;

NSLog(@"The price is %f", quantity * unitPrice);
// -> The price is 94.900002
但是 Swift 不会对表达式做隐式类型转换。针对上述情况,必须做显式类型转换,否则无法通过编译。
1
2
3
4
5
var quantity = 13
var unitPrice = 7.3

println("The price is \(Double(quantity) * unitPrice)")
// -> The price is 94.9
If
对于简单的 if 条件表达式,一般是不使用括号的。但是表达式之后必须要有大括号,即使在这个 if 条件内,只有一行代码。
1
2
3
4
5
6
7
8
9
10
var input = 7
if input < 0 {
    println("Not good")
}
else if input > 6 {
    println("Nice job")
}
else {
    println("OK")
}
这里要再重申一下, Swift 不会对表达式做隐式类型转换。所以在其他语言里很常见的使用一个数字作为 if 表达式,在 Swift 里是行不通的。传递给 if 的表达式结果必须是 true 或者 false。
1
2
3
4
5
6
7
8
9
var input = 1

// 必须做法显式类型转换
if Bool(input) {
    println("It's on")
}
else {
    println("It's off")
}
Switch
和 if 一样,switch 后边跟的表达式也是不需要括号的。跟多数语言不同的是,switch case 必须涵盖所有可能的值,且不会自动 fall through。也就是说,大多数情况下,都必须提供一个 default case,并且每一个具体的 case 都必须含有代码。由于没有自动 fall through,因此不需要在每个 case 最后加上 break 语句了。
此外,还可以在 case 中使用 range。Swift 提供两种 range,语法上来看为 ... 和 ..<。例如 1...100 和 1..<100。前者表示 [1, 100] 区间内的整数,包括 1 和 100。后者表示 [1, 100) 区间内的整数,包括 1,不包括 100。
1
2
3
4
5
6
7
8
9
10
11
12
13
14
15
16
let windSpeed = 5
switch windSpeed {
case 0...3:
    println("Very calm")
case 4...6:
    println("Windy")
case 7...9:
    println("Blowing a gale")
case 10...12:
    println("Tornado")
default:
    // 由于 windSpeed 是一个 Int,要显式涵盖所有 Int 是不可能的
    // 所以必须有 default。虽然这里 default 内不做任何事情,
    // 但 Swift 要求必须含有代码,所以需要 break。
    break
}
Loops
最常见的 for 循环,和大多数语言一致,只不过括号仍然不是必须的。但 for 内部的语句块必须包在一对大括号内。
1
2
3
4
var result = 0
for var i = 0; i < 100; i++ {
    result += i
}
while 和 do-while 语句也是类似的。
另外还有一个 for-in 循环,可以用来循环 range,数组,字典甚至字符串等。
1
2
3
4
5
6
7
8
var result = 0
for n in 1...100 {
    result += n
}

for char in "YeHao" {
    println(char)
}
Functions
Swift 在很多地方都能省略括号,但是定义函数和调用函数的时候,括号都是必须的。
使用 func 关键字来定义一个函数。
1
2
3
4
func myFunction() {
    println("My first function.")
}
myFunction()
如果函数需要接收参数,则必须在定义时指定参数的类型。
1
2
3
4
func personInfo(name:String, age:Int) {
    println("Hello. My name is \(name) and I'm \(age)")
}
personInfo("Ye Hao", 24)
默认 Swift 认为所有的参数都是常量,如果要在函数内部更改某个参数的值,则需要将其定义为变量,否则无法编译。
1
2
3
4
func next(var i:Int) {
    i += 1
}
next(2)
当参数有默认值的时候,若在调用时需要覆盖默认值,则必须在调用时指定参数名。这一点跟 Objective-C 的方法调用语法有点像。
1
2
3
4
func sayHelloTo(person:String = "Ye Hao") {
    println("Hello, \(person).")
}
sayHelloTo(person: "Lingzheng")
这在只有一个含有默认值的参数时感觉必要性不是很明显。如果有多个参数带有默认值的话,调用函数的方式就更加丰富了。
1
2
3
4
5
6
7
func add(a:Int = 50, b:Int = 40) -> Int {
    return a + b
}
add()             // 90
add(a: 40, b: 30) // 70
add(a: 40)        // 80
add(b: 20)        // 70
上面的代码还展示了返回值的使用。
Arrays
和 Objective-C 不同,Swift 里的数组是类型安全的,一个数组里只能包含一个类型的数据。在我熟悉的语言里边,这和 ActionScript 3.0 的 Vector 是一样的。数组元素索引从 0 开始。
之前说过 var 声明变量,let 声明常量。在 Objective-C 里边有 NSArray 和 NSMutableArray,在 Swift 里边用 let 声明的数组即 immutable,用 var 声明的数组即 mutable。
下面通过一段代码来说明几个常见的方法和属性:
1
2
3
4
5
6
7
8
9
10
11
12
13
14
15
16
17
18
19
20
21
22
23
24
25
26
27
28
29
30
31
32
// 先声明后赋值
var colors:[String]
colors = ["Red", "Green", "Blue"]

// 使用 [] 来获取元素
println(colors[1]) // Green

// 往数组末尾推入元素的两种方式
colors.append("Cyan")
colors += ["Yellow"]

// 往指定索引推入新元素
colors.insert("Magenta", atIndex: 4)

// 移除最后一个元素
colors.removeLast()

// 移除索引为 3 的元素
colors.removeAtIndex(3)

// 获取数组的长度
colors.count

// isEmpty 属性检查数组是否为空
if colors.isEmpty {
    println("No colors available")
}

// 使用 for-in 来循环数组
for color in colors {
    println(color)
}
Dictionary
Swift 的字典也分别要求 key 和 value 是类型安全的。例如,一个合法的字典,其 key 只能都是 Int 类型,或者都是 String 类型,但不能有些 key 是 Int 而有些是 String;其 value 也是这样的。
多数受 C 影响的语言使用大括号来描述字典,包括 Objective-C 后来新增的 @{} 语法糖。但 Swift 使用方括号。
下面这段代码展示了一些常见的方法和属性:
1
2
3
4
5
6
7
8
9
10
11
12
13
14
15
16
17
18
19
20
21
22
23
24
25
26
27
28
29
30
31
32
33
34
35
// 声明一个 key 和 value 都是 String 类型的字典
var cities = ["HZ": "Hangzhou", "NB": "Ningbo"]

// 若声明时不赋值,则需要指定 key 和 value 的类型
var students:[Int:String]

// 使用 [] 来访问元素
// Playground 中为 Optional("Hangzhou") 的输出
println(cities["HZ"])

// 新增或更新元素值的 2 种方式
// 1) 使用 []
cities["WZ"] = "Wen Zhou"

// 2) 使用 updateValue:forKey: 方法
// 若 key 已存在,则该方法返回原有的 value
// 下面这段代码返回 "Wen Zhou"
cities.updateValue("Wenzhou", forKey: "WZ")

// 若 key 不存在,则该方法返回 nil
cities.updateValue("Shaoxing", forKey: "SX")

// 删除某个 key-value pair 的 2 种方式
// 下面 2 种方式会把整个 key-value pire 移除
// 而不是把那个 key 所对应的值设置为 nil
cities["SX"] = nil
cities.removeValueForKey("WZ")

// 使用 count 获取当前字典的长度
println("\(cities.count) cities left.")

// 使用 for-in 遍历
for (abbr, fullname) in cities {
    println("\(abbr) is the abbreviation for \(fullname)")
}
Tuples
上一节最后一段代码的 for-in 循环里边,有一个括号包裹的元素,(abbr, fullname),叫做 Tuple,读作 /ˈtjuːp(ə)l/ 或者 /ˈtʌp(ə)l/。这个类型的名字源于下面这些词汇的后缀:double,triple,quadruple,quintuple,sextuple,septuple,octuple 等,表示一组元素。所以把一堆元素用逗号分隔,并用括号包裹,就创建了一个 Tuple。
有了这个东西,就能够让一个函数看起来像是返回多个值了。
1
2
3
4
5
6
7
8
9
// 函数返回 Tuple
func getTheSoundTrackNameAndTrackNumber() -> (String, Int) {
    return ("The Path (A New Beginning)", 29)
}

let result = getTheSoundTrackNameAndTrackNumber()

// 使用索引访问 Tuple 中的元素
println("You're listening \(result.1): \(result.0)")
上述索引访问的方式看起来不是很直观,可以在定义函数返回值的时候,给出具体的名称。
func getTheSoundTrackNameAndTrackNumber() -> (name:String, track:Int) { return (“The Path (A New Beginning)”, 29) }
1
2
let result = getTheSoundTrackNameAndTrackNumber()
println("You're listening \(result.track): \(result.name)")
但其实最简单的方式,应该是不使用 result 这个临时变量,直接在调用函数的时候就完成处理。
1
2
3
4
5
6
func getTheSoundTrackNameAndTrackNumber() -> (String, Int) {
    return ("The Path (A New Beginning)", 29)
}

let (name, track) = getTheSoundTrackNameAndTrackNumber()
println("You're listening \(track): \(name)")
值得注意的是,Tuple 只是为了把几个元素组在一起做一些快速处理。如果这些成组的元素本身带有特殊意义,或者需要在很多地方做同样的组合,则应该考虑使用 Class 或者 Struct。
Optionals
Swift 要求普通变量在使用前必须被赋值。例如下边这两行代码将无法通过编译。
1
2
var temperature:Int
println("The temperature is \(temperature) degrees.")
XCode 会报错说 “Variable ‘temperature’ used before being initialized”。这说明 Swift 不会默认给变量赋予初始值。当然,在这里可以初始化 temperature = 0。但是如果这个变量的值实际是来自服务端的,当接口数据获取失败的时候,就不能准确反映出错的状况了。
如果一个变量可能没有值,则需要使用 Optional。定义 Optional 的方式很简单,在类型后面紧跟 ? 即可。使用的时候可以先和 nil 比较一下,再执行后续操作。
1
2
3
4
5
var temperature:Int?

if temperature != nil {
    println("The temperature is \(temperature) degrees.")
}
上述代码还有个问题。如果 if 判断 temperature 确实是有值的,那么输出结果将类似这样:
1
The temperature is Optional(23) degrees.
注意数字 23 被 Optional() 所包裹。如果碰到上面这种情况,确定变量是有值的,则在使用时在变量名后紧跟 ! 来强制解析(force unwrapping)。
1
2
3
4
5
6
7
var temperature:Int?

temperature = 23

if temperature != nil {
    println("The temperature is \(temperature!) degrees.")
}
在前面 Dictionary 一节里,也提到过 Optional,可以使用下面这种方式来处理。
1
2
3
4
5
6
7
8
9
10
var cities = ["HZ": "Hangzhou", "NB": "Ningbo"]

// 使用 if let
// 此时不需要使用 ! 来 force unwrapping
if let city = cities["HZ"] {
    println("The city is \(city)")
}
else {
    println("City not found")
}
Enums
Swift 的 Enum 枚举类型在用法上比 Objective-C 的要更丰富一些。下面的代码定义了一组包含 4 个成员的 SeatPreference 的枚举。
1
2
3
4
5
6
enum SeatPreference {
    case Middle
    case Aisle
    case Window
    case NoPreference
}
这里的 case 和 switch 语句不同,后边没有冒号。上面的定义也可以用逗号分隔,写在一行。
1
2
3
enum SeatPreference {
    case Middle, Aisle, Window, NoPreference
}
使用的时候在语法上比较灵活。
1
2
3
4
5
6
// 使用 . 语法
let myPrefers = SeatPreference.Window

// 先声明后赋值,因类型已知,可以省略 SeatPreference
var hisPrefers:SeatPreference
hisPrefers = .Aisle
之前在 switch 一节讲到 switch case 需要涵盖所有的可能,因此一般来说都需要 default。像上述这种成员数不多的枚举类型,就可以不用 default 把所有 case 都写完整。
1
2
3
4
5
6
7
8
9
10
switch myPrefers {
case .Window:
    println("Book me a WINDOW seat")
case .Aisle:
    println("Book me an AISLE seat")
case .Middle:
    println("Book me a MIDDLE seat")
case .NoPreference:
    println("Well, whatever seat is fine")
}
Closures
Closure 闭包,对应原来 Objective-C 里边的 Block。如果从 JavaScript 的角度来看,有点像是把函数作为参数使用。函数本身就是一种闭包。跟 Objective-C Block 一样,初看 Swift 闭包的语法会感觉有些怪异。下面的代码创建了一个不接受任何参数,返回值为空的闭包,和一个接受该格式的闭包作为参数的函数。
1
2
3
4
5
6
7
8
9
10
11
let aClosure = {
    println("This is a closure")
}

func aFuncAcceptsAClosure(closure:() -> ()) {
    for i in 1...5 {
        closure()
    }
}

aFuncAcceptsAClosure(aClosure)
如果闭包需要接受参数或者有返回值,那在定义时,左括号后边会带上参数及返回值的定义,同时用 in 关键字来分隔闭包的主体代码。下面这段代码使用了 Swift 内置的 sorted 方法来展示带参数和返回值的闭包。
1
2
3
4
let unsortedArray = [12, 43, 7, 1, 9, 35]
let sortedArray = sorted(unsortedArray, {(first:Int, second:Int) -> Bool in
    return first < second
})
对比一下在 Objective-C 里边的操作,个人感觉 Swift 代码看着更加直观一些。
1
2
3
4
5
NSArray *unsortedArray = @[@12, @43, @7, @1, @9, @35];
NSArray *sortedArray = [unsortedArray sortedArrayUsingComparator:^(id obj1, id obj2) {
    return [obj1 compare:obj2];
}];
NSLog(@"%@", sortedArray);
Swift 里边很多内置的方法都会用到闭包,例如动画完成回调,网络请求回调等。
Classes
Swift 不再需要像 Objective-C 那样,需要 .h 和 .m 两个文件来定义一个类。只要使用 class 关键字就可以了。
1
2
3
4
5
6
7
8
9
10
class Animal {
    // properties
    var name:String
    var numberOfLegs:Int

    // methods
    func description() {
        println("Animal name: \(name)")
    }
}
但是,上述代码是无法编译的。因为 name 和 numberOfLegs 没有被初始化。这里有两种解决方式,一种是使用 Optional,另一种则是初始化之。而初始化又有好几种做法。
初始化方法一:直接在 var 的同时赋值。
1
2
var name:String = "Not having a name yet"
var numberOfLegs:Int = 0
初始化方法二:在 class 内提供一个 init() 方法。
1
2
3
4
5
6
7
8
9
class Animal {
    // other code not shown here

    // init 方法不需要 func 关键字
    init() {
        name = "Not having a name yet"
        numberOfLegs = 0
    }
}
新建实例的时候不需要 new 关键字,直接在 class 名之后加上括号即可。
1
2
3
4
var bird = Animal()
bird.name = "Bird"
bird.numberOfLegs = 2
bird.description()
如果需要在实例化的同时设置属性,则在 class 内部定义多个 init 方法。
1
2
3
4
5
6
7
8
9
10
11
12
13
14
15
16
class Animal {
    // other code not shown here

    // init 方法不需要 func 关键字
    init() {
        name = "Not having a name yet"
        numberOfLegs = 0
    }

    init(name:String, legs:Int) {
        self.name = name
        self.numberOfLegs = legs
    }
}

var bird = Animal(name: "Bird", legs: 2)
继承的话在 class 定义时,名称后面跟上冒号,加上继承者名称即可。如果需要覆盖某些方法,则使用 override 关键字。
1
2
3
4
5
6
7
8
9
10
11
12
13
14
15
16
class Bird:Animal {
    override init () {
        super.init(name: "Bird", legs: 2)
    }

    override func description() {
        super.description()
        println("The bird has \(numberOfLegs) legs.")
    }

    func fly() {

    }
}

var bird = Bird()
之前在 Function 一节有说到过函数有多个参数,以及初始值是否存在,会有不同的调用方式。但在调用类的方法时,除了第一个参数外,后边的所有参数都是要显式命名的。
1
2
3
4
5
6
7
8
9
class Calculator {
    func add(number:Int, anotherNumber:Int) -> Int {
        return number + anotherNumber
    }
}

var cal = Calculator()
// 使用 cal.add(12, 24) 将无法通过编译
cal.add(12, anotherNumber: 24)
最后,Swift 类的访问级别有如下 3 类:
private仅在当前源文件内可访问;internal可跨文件访问,但必须在同一个编译模块内部跨文件,这是默认不写关键字的级别;public可以在所有引入了这一模块的文件内访问。
当然,你不能在一个 internal 的 class 内部声明 public 的属性或者方法,这本身就是没有意义的。
Conclusion
以上是我最近入门 Swift 看的最基本的一些内容。跟应用无关,仅仅是一些简单的语言特性。保留了 Objective-C 里边详细地描述方法名的特点,在语法上会比原先很多方括号的方法调用要简洁一些。目前在 XCode 里新建项目默认的语言还是 Objective-C,Swift 应该还要很长一段时间与 Objective-C 共存吧。